Surgical Asepsis – This course is designed to understand the concept of community health nursing: nurses’ roles and interventions in family health, school health, occupational health, environmental health, elderly health care, gender issues, disaster management and principles and terminology of epidemiology. The aim of the course is to acquire knowledge and skills in community health nursing.
Surgical Asepsis (Include Gowning, Hand Washing and Gloving)
Definition of Surgical Asepsis:
Surgical asepsis, also known as sterile asepsis, is used during all invasive procedures. An invasive procedure involves the entrance of medical instruments into the body, generally through puncturing or cutting the skin. Surgical asepsis is important to prevent and reduce the risks associated with invasive procedures.
Surgical asepsis is used when foreign objects are being placed inside of the body or excisions are being made in the skin. Examples of surgical asepsis include:
- Insertion of a chest tube
- Removal of a mole
- A kidney transplant
- Insertion of a feeding tube
Principles of Asepsis
There are many principles of asepsis that must be followed to ensure that potentially infectious microorganisms are eliminated from the environment. Principles of asepsis include the following:
- Use only sterile items within a sterile field
- If a sterile object touches a non-sterile object, it becomes non-sterile
- Sterile items that are held below the waist level are non-sterile
- Sterile fields must always remain in view to be considered sterile
- Avoid contamination when adding new sterile equipment to a sterile field
- Sterile objects are non-sterile if exposed to airborne microorganisms for an extended time
- Puncture, moisture, or tear in a sterile barrier must be considered non-sterile
- The border of the sterile field is considered non-sterile
- Any doubt regarding the sterility of an object must be considered non-sterile
- Fluids flow in the direction of gravity
- Sterile people and objects may only come into contact with other sterile people and objects
- Movement around the sterile field must not contaminate the sterile area
Definition Of Hand Washing:
Hand washing or hand hygiene is the act of cleaning one’s hands with or without the use of water or another liquid, or with the use of soap for the purpose of removing soil, dirt, and/or microorganisms.
Or,
Hand washing is a vigorous, brief rubbing together of all surfaces of hands lathered in soap followed by rinsing under stream water.
Classification of Hand Washing:
A. Social hand wash
a) Social hand wash is performed to render the hands physically clean and to remove transient micro-organisms.
b) It is an infection control practice with a clearly demonstrated efficacy and remains the cornerstone of efforts to reduce the spread of infection
B. Hygienic hand wash
a) Why should a hygienic hand wash be performed?
- To remove or destroy transient micro-organisms and to substantially reduce resident micro-organisms during times when surgical procedures are performed.
b) When should a hygienic hand wash be performed?
- Before all aseptic procedures on the ward.
c) What should be used for performing a hygienic hand wash?
- An approved antiseptic detergent (eg 4% Chlorhexidine gluconate or 7.5% Povidone iodine).
C. Surgical hand wash
a) Why should a surgical hand wash be performed?
- To remove or destroy transient micro-organisms and to substantially reduce resident micro-organisms during times when surgical procedures are performed. It is intended to decrease the risk of wound infections should surgical gloves become damaged.
b) When should a surgical hand wash be performed?
- Before all surgical/invasive procedures.
c) What should be used for performing a surgical hand wash?
- An approved antiseptic detergent (eg 4% Chlorhexidine gluconate or 7.5% Povidone iodine).
Importance/Purpose of Hand Washing:
1. To clean dirt and transient micro-organisms from the hands.
2. To reduce total microbial counts over time.
3. To prevent cross infection.
4. It reduces the risk of self-infected disease.
5. It helps to improve patient care.
6. Helps to create safe working environment.
7. To prevent transfer of micro-organisms from the environment to the client and from the client to the health care worker.
8. Helps to prevent nosocomial infection/hospital acquired infection.
9. Hand washing is a basic technique for infection control.
(Ref by-Annamma Jacob/The art of nursing practice//1/614+Lecture)
Indication of Hand Washing:
A. Before:
a) Feeding the patient
b) Performing invasive procedure.
c) Starting any work.
d) Applying gloves.
e) Any direct client care or contact e .g. dressings, toileting, showering.
f) Between different procedures on the same client
g) Preparing food, eating or feeding others
h) Before eating.
i) Caring for susceptible patient
B. After:
a) Finishing any work.
b) Direct contact with blood or body substances.
c) Removing gloves
d) All patient contact
e) In contact with broken skin or abdominal skin conditions such as rashes or abrasions.
f) Going to the toilet.
g) Handling soiled equipment, clothing or bed linen
h) Toileting patients and touching associated objects
i) Contact with microbial contamination is likely to occur
C. Before and after (both):
a) Some activities such as going to the toilet, eating, handling food or coughing or sneezing.
b) Any patient care procedure
c) Contact with invasive devices such as catheters or respiratory equipment
d) Delivering an infection, finger sticks and heel- sticks
e) Whenever hands are visibly soiled
f) Wearing gloves.
g) In contact with mucous membrane.
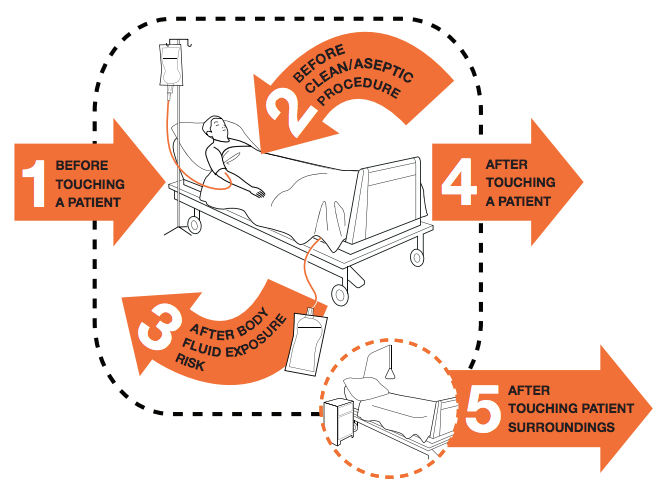
Five Moments for Hand Hygiene:
Procedure of (Routine/Social/Clinical) Hand Washing:
1. Remove jewelry such as- ring, bracelet, watches, etc.
2. Wet hands thoroughly and lather vigorously using a neutral pH liquid soap for 15-30 seconds
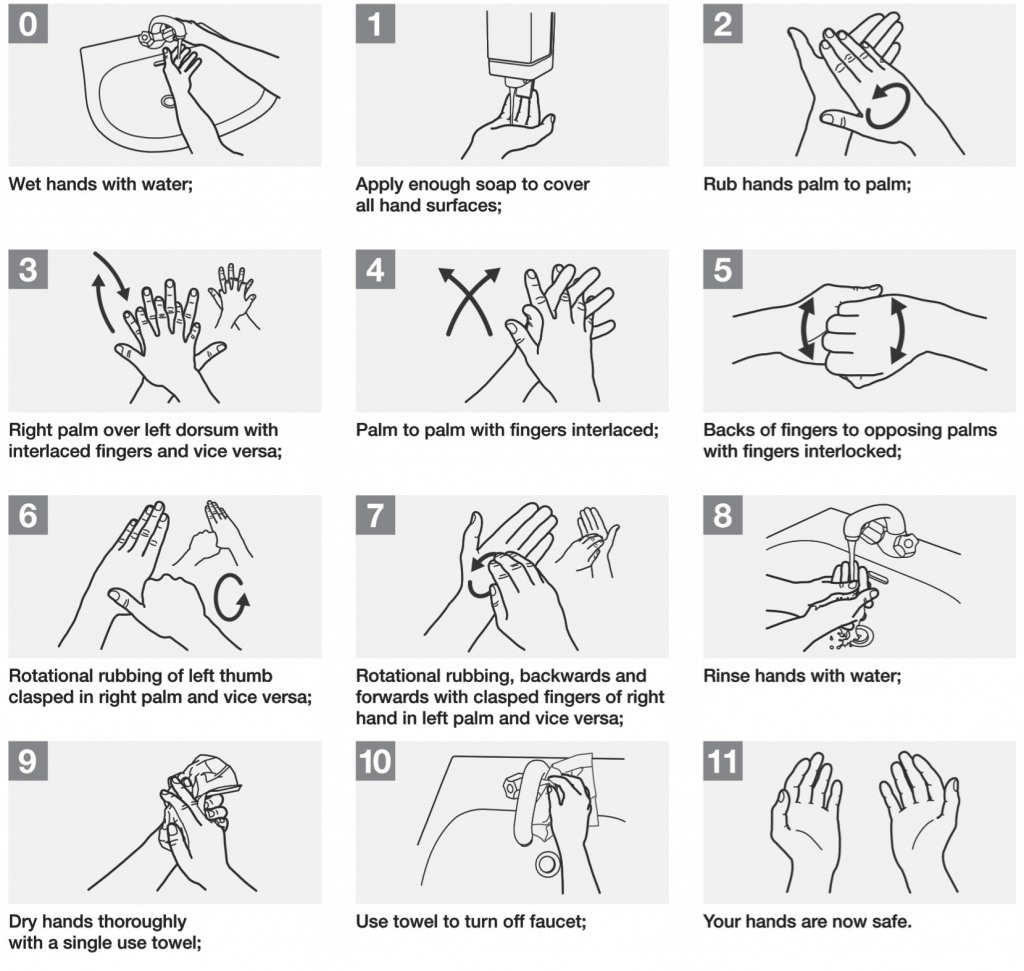
3. Rub hands palm to palm
4. Right palm over left dorsum with interlaced fingers and vice versa
5. Palm to palm with fingers interlaced
6. Backs of fingers to opposing palms with fingers interlocked
7. Rotational rubbing of left thumb clasped in right palm and vice versa
8. Rotational rubbing, backwards and forwards with clasped fingers of right hand in left palm and vice versa
9. Rinse under running water
10. Do not touch taps with clean hands if elbow or foot controls are not available, use paper towel to turn off taps
11. Pat hands dry using paper towel
Procedures of Surgical Hand Washing:
A traditional, standardized, surgical hand scrub procedure includes:
- Remove jewelry including rings, watches, and bracelets.
- Don a surgical mask during hand scrub.
✔ Anyone standing at the scrub sink (regardless of whether they are scrubbing), must wear a surgical mask while in the presence of anyone else performing hand scrub activity.
- Wash hands and forearms if visibly soiled with soap and running water immediately before beginning the surgical scrub.
- Clean the subungual areas of both hands under running water using a disposable nail cleaner.
- Rinse hands and forearms under running water.
- Dispense the approved antimicrobial scrub agent according to the manufacturer’s written
- directions. Apply the antimicrobial agent to wet hands and forearms using a soft, nonabrasive sponge.
- A three- or five-minute scrub should be timed to allow adequate product contact with skin, according to the manufacturer’s written directions.
- Visualize each finger, hand, and arm as having four sides. Wash all four sides effectively,
- keeping the hand elevated. Repeat this process for opposite fingers, hand, and arm.
- For water conservation, turn water off when it is not directly in use, if possible.
- Avoid splashing surgical attire.
- Discard sponges, if used, in appropriate containers.
- Hands and arms should be rinsed under running water in one direction from fingertips to elbows as often as needed.
- Hold hands higher than elbows and away from surgical attire.
- In the OR, dry hands and arms with a sterile towel before donning a sterile surgical gown and gloves.
Surgical Gloving
Definition of Sterile Gloving:
Sterile gloving is the process of placing a sterile glove on each hand following a scrubbing hand washing process. This is to reduce infection during an intensive procedure, or one in which it would be bad for germs and bacteria to enter the body.
Or,
(Ref by-www.medicalfaq.net)
Sterlie gloving is the prcedure of donning sterile rubber gloves, in such a way as to preserve asepsis of the operator, before each surgical procedure.
Purposes of Sterile Gloving:
According to WHO (World Health Organization)
1. To reduce the risk of contamination of health-care workers hands with blood and other body fluids.
2. To reduce the risk of germ dissemination to the environment and of transmission from the health- care worker to the patient and vice versa, as well as from one patient to another.
(Ref by-www.who.int)
Types of Gloving:
There are two types of gloving. The following types are given below-
1. Gloving by closed glove or surgical glove: Closed gloving is working from within the cuffs of the surgical gown the hands never touch the outside of the gown or gloves.
2. Gloving by open glove or general glove
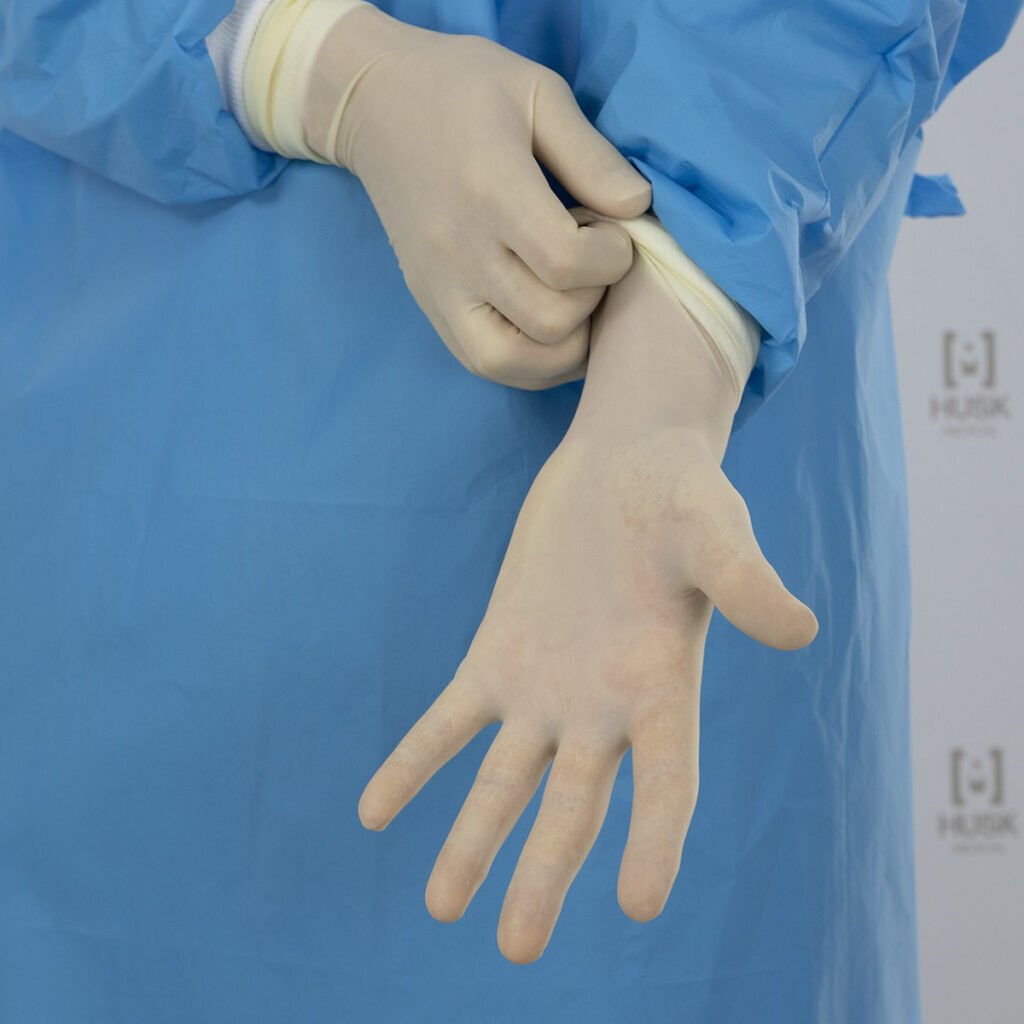
Procedure of Surgical Gloves Wearing:
This is the recommended technique for those involved in a surgical procedure.
1. Grip the sterile inside pack through your gown cuffs keeping the fingers inside the gown cuff, open and display the gloves upside down.
2. Place your right thumb inside the top cuff edge of the right glove (thumb-to-thumb), pick up and lay flat on your right hand.
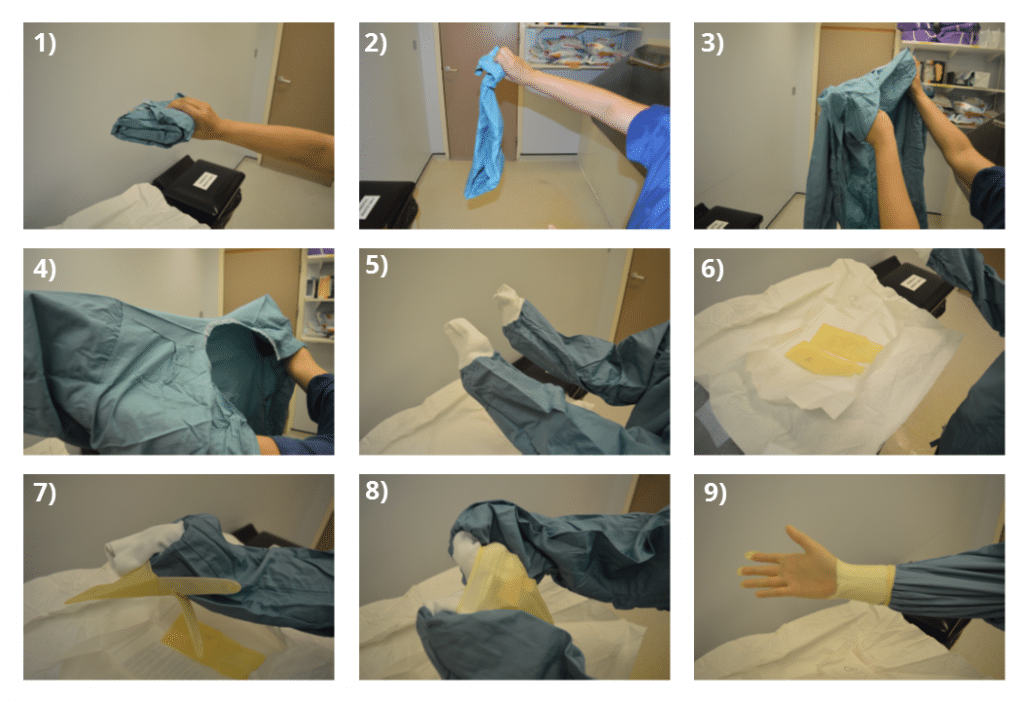
3. Place left thumb under the cuff exposed on right glove, and stretch glove over right hand.
4. Keeping your right fingers straight, pull down the glove with your left hand, using a combination of glove and sleeve pulling.
5. Ensure the white cuff remains inside the glove.
6. Repeat procedure with left glove.
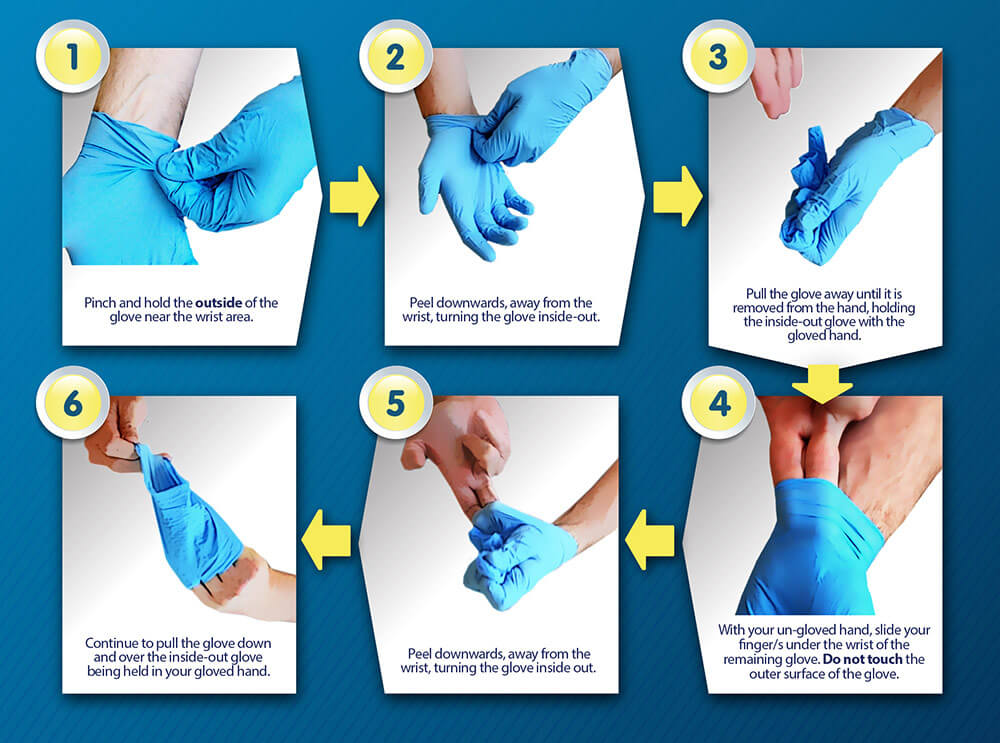
Procedure of Removing Surgical Gloving:
With both hands gloved, grasp the outside of one glove at the top of your wrist, being careful not to touch your bare skin. Peel off this first glove, peeling away from your body and from wrist to fingertips, turning the glove inside out. Hold the glove you just removed in your gloved hand.

Procedure of Wearing Open Gloves:
1. Pick up the cuff of the right glove with your left hand. Slide your right hand into the glove until you have a snug fit over the thumb joints and knuckles. Your bare left hand should only touch the folded cuff-the rest of the glove remains sterile.
2. Slide your fingertips into the folded cuff of the left glove
3. Use gloved left hand pick up folded cuff of right glove and pull glove up to gowned wrist.
4. Place the fingers of the gloved right hand under the cuff of the partially gloved left hand. Unfold the cuff down over your gown sleeves. Make sure your gloved finger tips do not touch your bare forearms or wrists
Indications for Gloving and For Glove Removal
| Indication | |
| Gloves on | a) Before a sterile procedure b) When anticipating contact with blood or another body fluid, regardless of the existence of sterile conditions and including contact with non-intact skin and mucous membrane |
| c) Contact with a patient (and his/her immediate surroundings) during contact precautions. | |
| Gloves Off | a) As soon as gloves are damaged (or non-integrity suspected) b) When contact with blood, another body fluid, non-intact skin and mucous membrane has occurred and has ended e) When contact with a single patient and his/her surroundings, or a contaminated body site on a patient has ended d) When there is an indication for hand hygiene. |
(Ref by- www.who.int)
Personal Protective Techniques
Personal Protective Equipment (PPE)
PPE is equipment that will protect the user against health or safety risks at work. It can include items such as safety helmets, gloves, eye protection, high-visibility clothing, safety footwear and safety harnesses. It also includes respiratory protective equipment (RPE).
Personal protective equipment for health staff handling coronavirus patients
Full protective gear given to staff carrying out procedures likely to generate airborne droplets from mouth, throat or lungs.
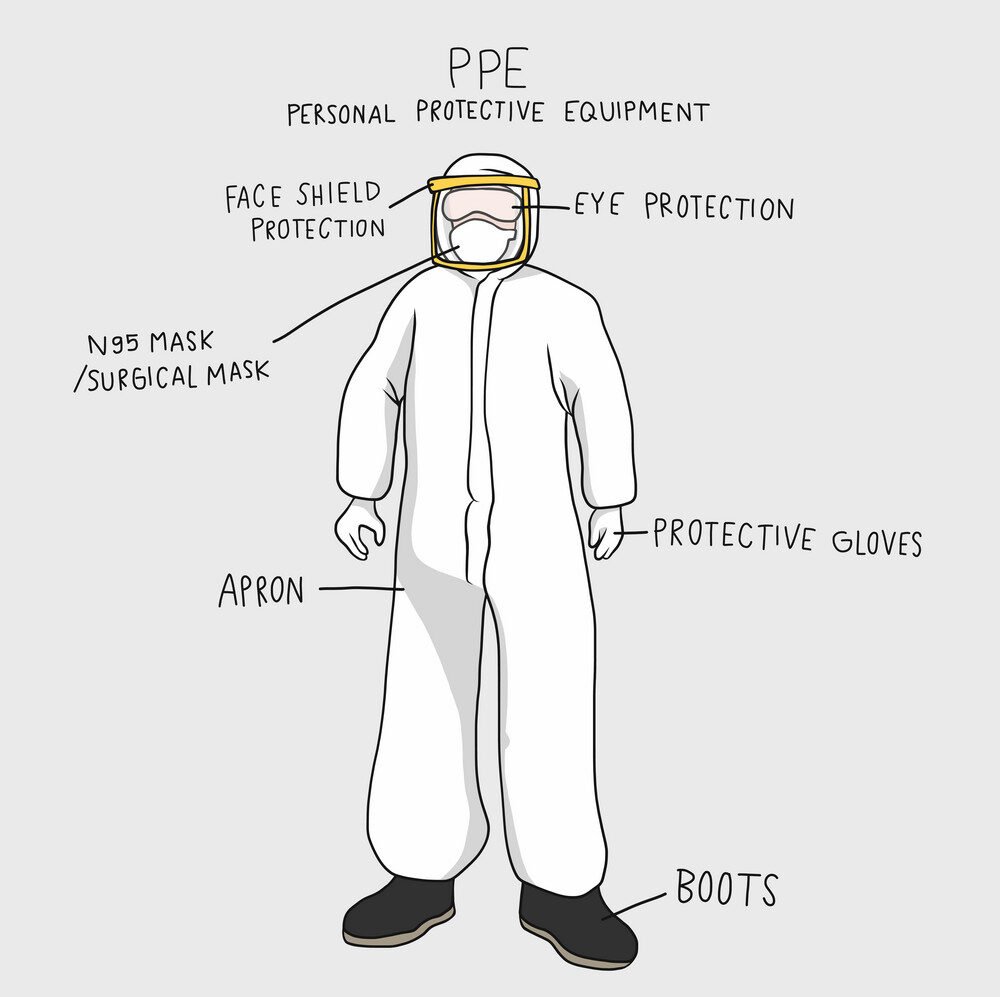
PPE Types
The different types of personal protective equipment are:
- Face Shields
- Gloves
- Goggles and Glasses
- Gowns
- Head Covers
- Masks
- Respirators
- Shoe Covers
Personal Protective Equipment (PPE) use in Standard Infection Control Precautions
- Gloves, aprons, long sleeved gowns, surgical masks, eye goggles, face visors and respirator masks are all examples of PPE that may be worn in the provision of healthcare.
- PPE is used in healthcare settings to create a barrier between healthcare workers and an infectious agent from the patient and to reduce the risk of transmitting micro-organisms from healthcare workers to patient(s). In addition PPE may sometimes be used by the patient’s family/ visitors, particularly if they are providing direct patient care e.g. assisting patient with toileting. In these circumstances carers must be fully inducted in the use of PPE and Hand Hygiene.
- The choice of PPE should be based on a risk assessment of potential exposure to blood / body fluids/infectious agents.
- PPE should be available at the point of use in both community and acute healthcare settings and staff should receive training on the correct use and disposal of PPE.
- If used inappropriately PPE can increase the risk of transmitting infections and put people at risk of acquiring an infection.