
Definition of Intramuscular Injection – Nursing is a profession within the healthcare sector focused on the care of individuals, families, and communities so they may attain, maintain, or recover optimal health and quality of life. Nurses may be differentiated from other healthcare providers by their approach to patient care, training, and scope of practice. Nurses practice in many specialisms with differing levels of prescriber authority.
Many nurses provide care within the ordering scope of physicians, and this traditional role has shaped the public image of nurses as care providers. However, nurses are permitted by most jurisdictions to practice independently in a variety of settings depending on training level. In the postwar period, nurse education has undergone a process of diversification towards advanced and specialized credentials, and many of the traditional regulations and provider roles are changing.
Nurses develop a plan of care, working collaboratively with physicians, therapists, the patient, the patient’s family, and other team members, that focus on treating illness to improve quality of life. Nurses may help coordinate the patient care performed by other members of an interdisciplinary healthcare team such as therapists, medical practitioners, and dietitians. Nurses provide care both interdependently, for example, with physicians, and independently as nursing professionals.
Definition of Intramuscular Injection
An intramuscular injection is a technique used to deliver a medication deep into the muscles. This allows the medication to be absorbed into the bloodstream quickly.
Advantages & Disadvantages of Intramuscular (IM) Route:
1. Absorption of drug is more rapid and uniform than subcutaneous injection due to rich blood supply to the muscle.
2. Lightly irritant drugs can be given that is too irritant for subcutaneous route.
3. Moderately large volume can be given, (but not more than 5ml)
4. Deport preparation can be administered, e.g. penicillin medroxyprogesterone. (Site: deltoid, gluteal region, thigh).
Disadvantages of Intramuscular (IM) Route
1. It is invasive and painful route.
2. Self-medication is difficult.
3. Large volume of drug cannot be given (max: 7-10ml)
4. Chance of local inflammation, infection, abscess formation, irritation and haematoma formation.
5. Chance of nerve injury, which may cause severe pain, paresis and even paralysis of the muscles.
6. Tissue binding or precipitate from solution may delay the appearance of drug in systemic circulation, e.g. Diazepam.
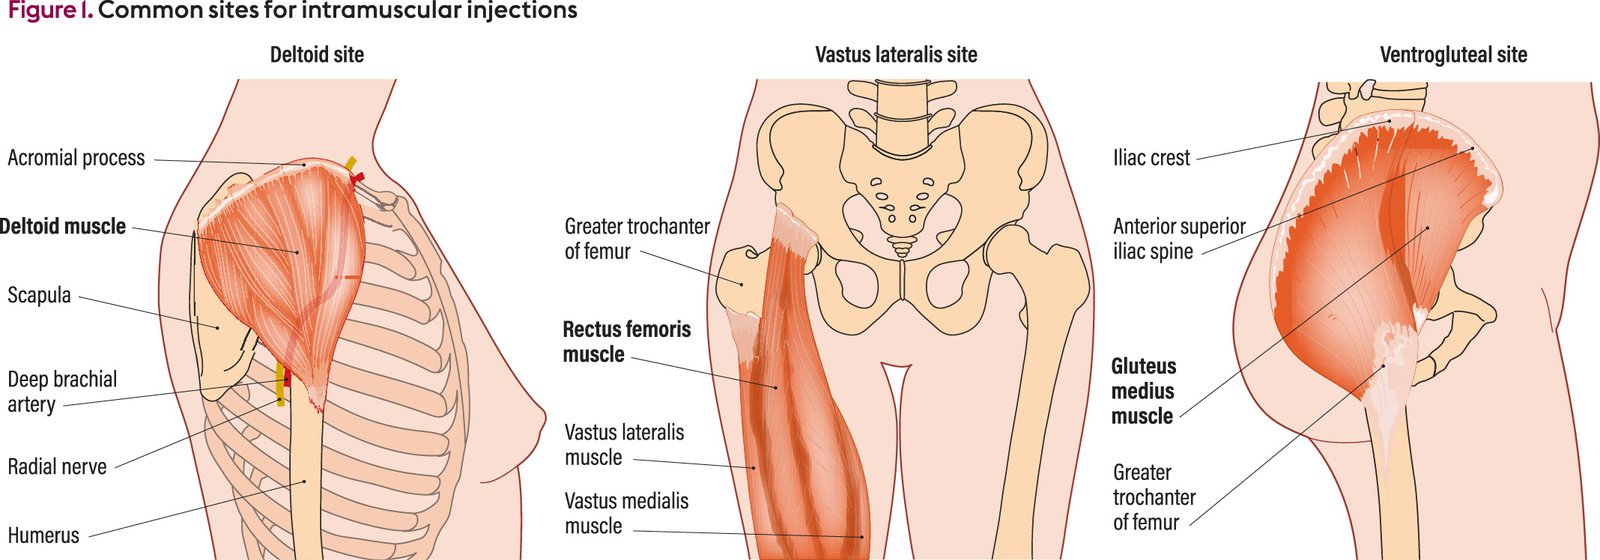
Sites for Giving Intramuscular Injection:
A. Dorsal Gluteal site-
Find out the greater trochanter of the femur and the posterior superior iliac spine. Draw an imaginary line between these two bony prominencer. Site will be upper and outer quadrant or divide the buttocks into four regions by imaginary lines, select the site at the upper and outer quadrant for the intramuscular injection.
B. Vastus Lateralis Site-
It is located on the lateral aspect of the thigh. It is the area between mid anterior thigh and mid lateral thigh one hands breadth from below the greater trochanter to one hand’s breadth above knee. The site avoids injury to the sciatic nerve.
C. Mid Deltoid Site-
Locate the lower edge of the acromion process and form a rectangle. The deltoid area is used to inject very small quantities of non irritating drugs.
D. Ventro-Gluteal Site-
Place the tip of the index finger on the anterior superior iliac spine of the patient, the middle finger just below the iliac creast. The ‘V shaped area is the area in which the injection can be given easily.
Procedure of administering I/M injection:
1. Assemble equipment and check physician’s order.
2. Explain procedure to patient.
3. Perform hand hygiene.
4. If necessary, withdraw medication from ampule or vial.
5. Do not add air to syringe.
6. Identify the patient carefully. There are three ways to do this
- Check the name on the patient’s identification badge.
- Ask the patient his or her name.
- Verify the patient’s identification with a staff member who knows the patient.
7. Provide for privacy. Have patient assume a position for the site selected
- Ventrogluteal – Patient may lie on back or side with hip and knee flexed.
- Vastus lateralis – Patient may lie on the back or may assume a sitting position.
- Deltoid – Patient may sit or lie with arm relaxed.
- Dorsogluteal – Patient may lie prone with toes pointing inward or on side with upper leg flexed and placed in front of lower leg.
8. Locate site of choice (vastus lateralis, ventrogluteal, deltoid, dorsogluteal) and ensure that the area is not tender and is free of lumps or nodules. Don disposable gloves.
9. Clean area thoroughly with alcohol swab, using friction. Allow alcohol to dry.
10. Remove needle cap by pulling it straight off.
11. Displace skin in a Z-track manner or spread skin at the site using your nondominant hand,
12. Hold syringe in your dominant hand between thumb and forefinger. Quickly dart needle into the tissue at 72- to 90-degree angel. 13. As soon as needle is in place, move your nondominant hand to hold lower end of syringe. Slide your dominant hand to tip of barrel.
14. Aspirate slowly (for at least 5 seconds), pulling back on plunger to determine whether the needle is in a blood vessel. If blood is aspirated, discard needle, syringe and inject in another site.
15. If no blood is aspirated, inject solution slowly (10 seconds per mL of medication).
16. Remove needle slowly and steadily. Release displaced tissue if Z-track technique was used.
17. Apply gentle pressure at site with small sponge.
18. Do not recap used needle. Discard needle and syringe in appropriate receptacle.
19. Assist patient to a position of comfort. Encourage patient to exercise extremity used for injection if possible.
20. Remove gloves and dispose of them properly. Perform hand hygiene.
21. Chart administration of medication, including the site of administration. This may be documented on the CMAR.
22. Evaluate patient response to medication within an appropriate time frame. Assess site, if possible, within 2 to 4 hours after administration.
Procedure of Subcutaneous Injection:
1. Assemble equipment and check physician’s order.
2. Explain procedure to patient.
3. Perform hand hygiene.
4. If necessary, withdraw medication from ampule or vial.
5. Identify patient carefully. Close curtain to provide privacy. Don disposable gloves (optional).
6. Have patient assume a position appropriate for the most commonly used sites.
- Outer aspect of upper arm- Patient’s arm should be relaxed and at side of body.
- Anterior thighs- Patient may sit or lie with leg relaxed.
- Abdomen-Patient may lie in a semi recumbent position.
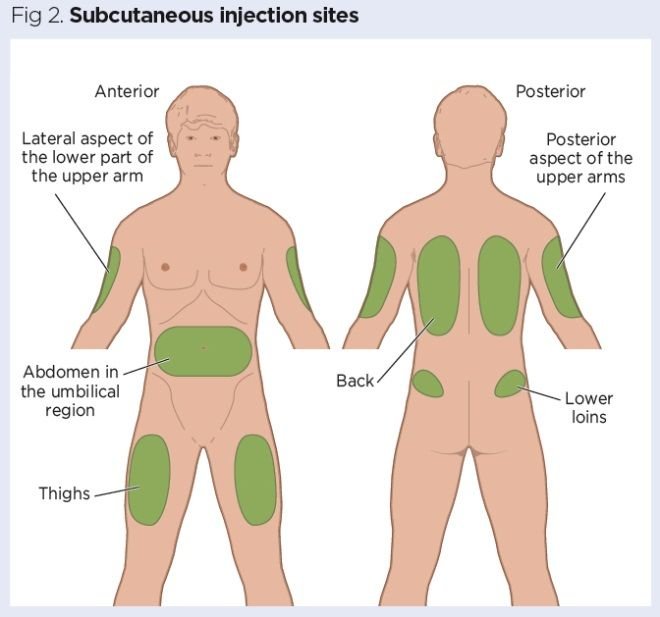
7. Locate site of choice (outer aspect of upper arm, abdomen, anterior aspect of thigh, upper back, upper ventral or dorso gluteal area). Ensure that area is not tender and is free of lumps or nodules.
8. Clean area around injection site with an alcohol swab. Use a firm circular motion while moving outward from the injection site. Allow antiseptic to dry. Leave alcohol swab in a clean area for reuse when withdrawing the needle.
9. Remove needle cap with no dominant hand, pulling it straight off.
10. Grasp and bunch area surrounding injection site or spread skin at site.
11. Hold syringe in dominant hand between thumb and forefinger. Inject needle quickly at an angle of 45 to 90 degrees, depending on amount and turgor of tissue and length of needle.
12. After needle is in place, release tissue. If you have a large skin fold pinched up, ensure that the needle stays in place as the skin is released. Immediately move your non dominant hand to steady the lower end of the syringe. Slide your dominant hand to the tip of the barrel.
13. Aspirate, if recommended, by pulling back gently on syringe plunger to determine whether needle is in the blood vessel. If blood appears, the needle should be withdrawn, the medication syringe and needle discarded, and a new syringe with medication prepared. Do not aspirate when giving insulin or heparin.
14. If no blood appears, inject solution slowly.
15. Withdraw needle quickly at the same angle at which it was inserted.
16. Massage area gently with alcohol swab. (Do not massage a subcutaneous heparin or insulin injection site.) Apply a small bandage if needed.
17. Do not recap used needle. Discard needle and syringe in appropriate receptacle.
18. Assist patient to a position comfort.
19. Remove gloves, if worm, and dispose of them properly. Perform hand hygiene.
20. Chart administration of medication, including the site of administration. This charting can be done on CMAR.
21. Evaluate patient response to medication within an appropriate time frame.